This blog provides information for educational purposes only. Read our complete summary for more info.
How to Build a Copper Still

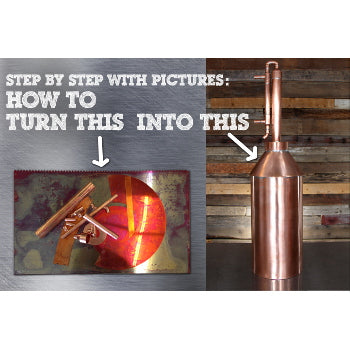
This article describes the process of building an all-purpose copper still. If you have some fabrication experience, you can make your own parts using the following instructions as a guide for assembly. If you aren’t an experienced fabricator or don’t have the mathematical skills needed to design and make still parts from scratch, don’t worry, we have done all of the hard work for you. We offer 100% copper, machine cut distiller parts kits. They come in three sizes: 1 gallon, 5 gallon, and 10 gallon.
Why Build a Still?
There are many reasons one might want to own a still. First, distillation equipment is an important piece of survival gear. Simple, small-scale distillation equipment can be used to manufacture valuable survival commodities such as purified water, fuel alcohol, and antiseptic, and more. In addition to potentially saving your life in an SHTF event, these items could also be used to trade for other goods and services. However, it is important to keep in mind that alcohol can only be legally distilled with the proper permits.
Fuel alcohol is useful outside of just survival situations. Farmers who have leftover grain can turn it into fuel for small equipment using distillation equipment.
Essential oils distillation is another popular use for our equipment. Our stills can be used to distill everything from rose hips and lavender to citrius oil.
Licensed commercial distillers probably wouldn't use our equipment to make production runs, as the equipment is much too small. However, our stills can be used as small scale pilot systems to run scaled down versions of recipes intended for larger equipment. This significantly reduces the time and cost associated with R&D of new potential products.
Background - Still Design
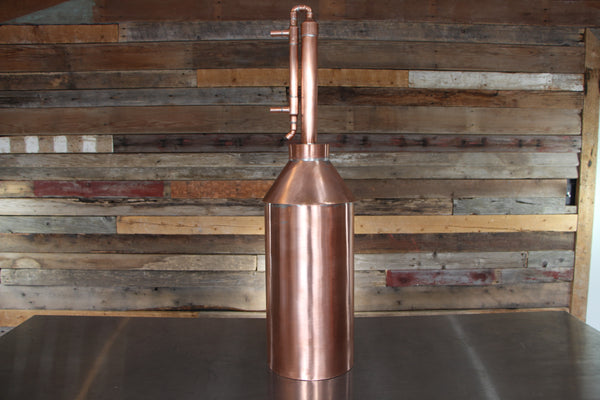
The design described in this article is referred to as “hybrid column still.” It’s a basic pot still that also includes a column, which may be filled with packing material to induce natural reflux. This design allows for greater efficiency and versatility than a dedicated pot or column still.
Safety Equipment and Tools:
You’ll need a few basic tools and materials in order to build a copper still: hammer, plumbing torch, pliers, small clamps, sandpaper, lead free solder, water soluble flux, work gloves, safety glasses, and a VOC mask. A vice would be handy but is not necessary.
Wear the safety glasses the entire time you’re working, make sure to wear the gloves when handling material or using the torch, and wear the mask when soldering. Always work in a well ventilated space.
Step 1: Boiler Assembly
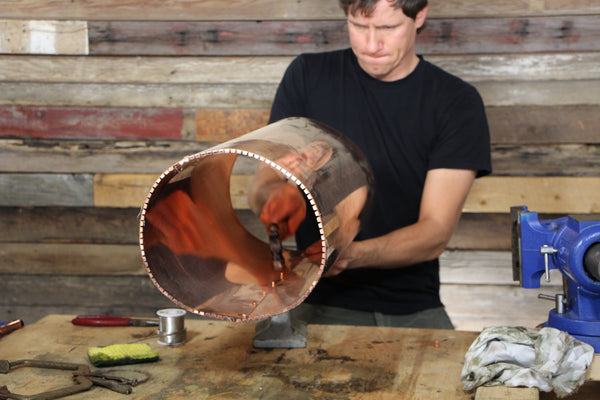
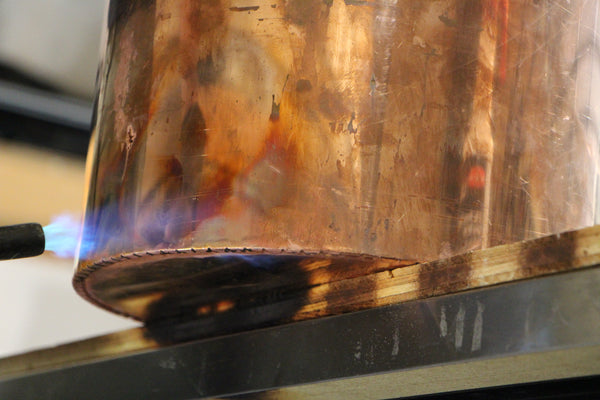
The boiler is a rectangular piece of copper with “tabs” cut into one of the long ends. Clawhammer Supply kits are pre-cut and the boiler already includes tabs. If you’re fabricating your own parts, use tin snips to cut small “triangles” into one of the long edges of the copper. Use a wire brush or sandpaper to rough up one side of the tabs. Then, bend the tabs toward the main section of the boiler at a right angle to the main section of the boiler, using a pair of pliers. The tabs form a ledge for the boiler bottom.
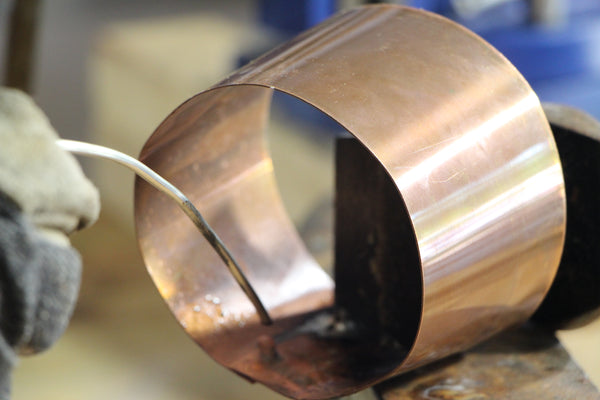
Once the tabs have been cut and bent, roll the sheet into a cylinder by bending the copper so that the short ends of the rectangle overlap one another. The tabs should face towards the center. Lap the copper by about half an inch. Once the boiler has been rolled into a cylinder, use sandpaper or a wire brush to rough up the areas where the copper will overlap and then secure the lap with locking pliers. This will make it easier to fill the seam with solder later.
If you’re fabricating your own parts out of raw copper, drill rivet holes through both pieces of the lap using a standard cordless drill. If you’re supplying your own still parts, you’ll need to acquire some solid copper rivets. Brake rivets work great for this and can be picked up at most fastener stores. Clawhammer kits include the rivets and the boiler comes with pre-drilled rivet holes.
Install rivets one by one. Place them into the rivet holes (they should fit snugly) and position a hard object under the rivet (anvil, hammer, etc.). Hammer the rivet until it is secure. Do not smash the rivet flat. Hit the rivet until it expands just enough to hold the boiler lap together. Follow the same process for the remaining rivets.
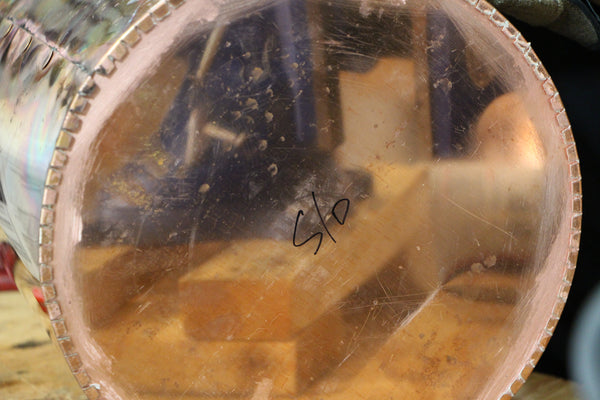
Once rivets have been installed, the boiler likely won’t be perfectly round. It will probably look more like an oval. This is normal and actually makes solder easier to apply because gaps in the lap will be smaller. You’ll round the boiler after soldering, which we’ll describe next.
Before soldering the boiler seam, apply water soluble flux to the joint. After the flux has been applied, use a standard propane plumbing torch and seal the entire seam of the boiler, as well as the rivet penetrations, using standard lead free plumbing solder.
When soldering, always follow this rule: slow and low. In other words, if you have an adjustable torch, dial the heat back to medium low. Also, apply heat sparingly and remove the torch from the copper as soon as the solder starts to melt. Excessive heating will cause soot to form on the copper, preventing solder from sticking.
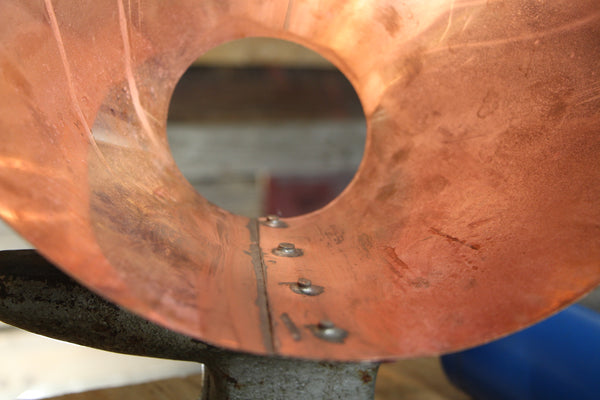
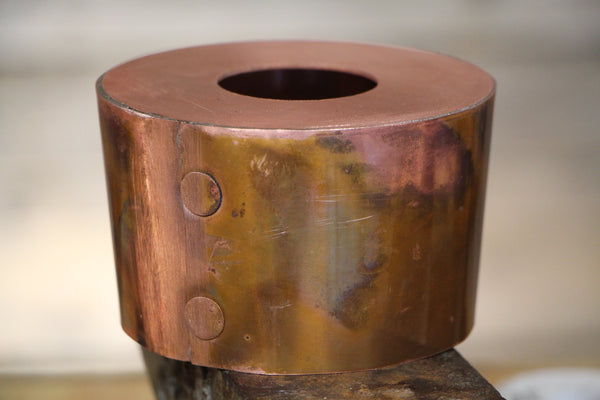
Once the boiler seam and rivet penetrations have been soldered, use your hands to round out the boiler, making it as perfectly round as you can. Once the boiler is round, you’re ready to install the boiler bottom, which is simply a circular piece of sheet copper that is small enough to fit into the boiler, but big enough to fit snugly.
Use a wire brush or sandpaper to rough up the outer half an inch of the circular bottom, as well as the top of the tabs (if you haven’t already done so). Apply flux to both of these areas, then, drop the round bottom into the boiler, making sure it fits snugly, sitting on top of the tabs. Once the boiler bottom piece has been seated into the boiler, apply additional flux to the top of the circular piece and the adjacent boiler wall – this is an important step.
In order for the bottom piece to seal properly insert a heavy object onto the boiler bottom which will hold the boiler bottom tight against the tabs of the boiler. When soldering the bottom, work the torch from the outside of the boiler while applying solder to the inside of the boiler.
Step 2: Vapor Cone
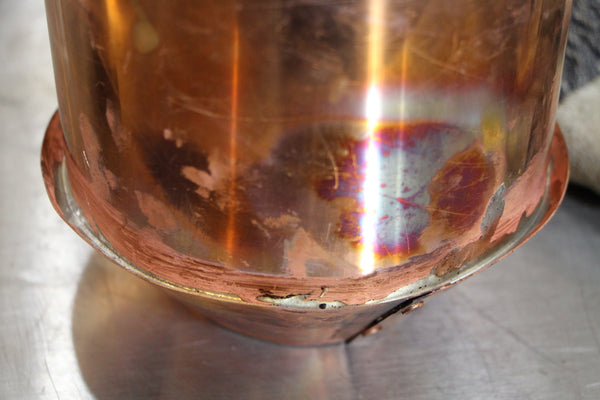
Once the boiler bottom has been soldered to the boiler, it is time to move onto the vapor cone. The cone is a “C” shaped piece of copper when flat. As with the boiler, use your hands to bend the vapor cone so that the ends of the “c” overlap each other by about half an inch. Use sandpaper or a wire brush. After the rivets have been installed, solder the seam from inside making a strong clean joint. Once the vapor cone has been soldered work it by hand and get it as round a possible.
The easiest way to join the vapor cone to the boiler is to place the vapor cone on a table, upside down (large opening up). Turn the boiler upside down and place the open end into the large opening of the boiler. Once the boiler is placed into the vapor cone, add weight to the boiler bottom (which is now on the top) so it will sit tight into the vapor cone. An anvil, cinder block, or even a 5 pound weight from a weight bench works great for this. Apply flux and solder the joint.
Step 3: Collar
Now that the vapor cone has been attached to the boiler, it is time to attach a collar to the inside of the small end of the vapor cone. The collar is simply a half an inch wide strip of copper. Form the collar so it fits inside of the vapor cone and solder it into the vapor cone. The collar is used to create a tight seal between the boiler and the column.
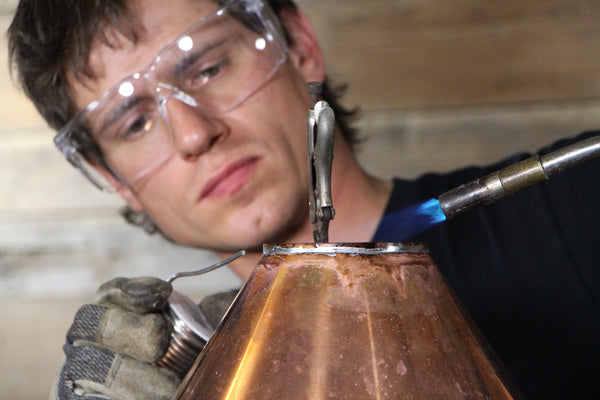
Step 4: Cap Skirt and Cap Plate
The cap skit is a slightly tapered piece of copper that attaches to the bottom of the column assembly, allowing it to fit snugly down into the collar on the vapor cone. Shape, rivet, and solder just like you did to the rest of the pieces.
Once formed, it gets permanently soldered to a cap plate, which is a slightly thicker (15 gauge) copper donut. The donut fits into the larger end of the tapered cap skirt. Note: The cap skirt and collar do NOT get soldered together. This allows the still to be “opened” for filling.
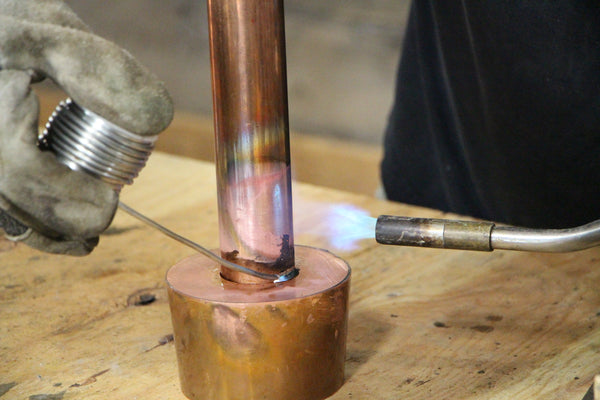
Step 5: Column and Condenser
Column and condenser parts are the easiest part of the assembly process. Simply slide a 1 ½” column pipe into the cap plate and solder it into place.
Atop the column will be a 1 ½” x ½” reducer, and two 90 degree street elbows. Below the second street elbow, an inline condenser should be installed which is comprised of two ¾” x ½” x ½” tee’s , a piece of ¾” pipe that joins the tees, and a ½” pipe that runs all the way through the tees and inside of the ¾” connector.Note: the stops inside of the ½” tee openings need to be drilled out so a ½” pipe can run all the way through (the Clawhammer kit comes with pre-drilled tees).
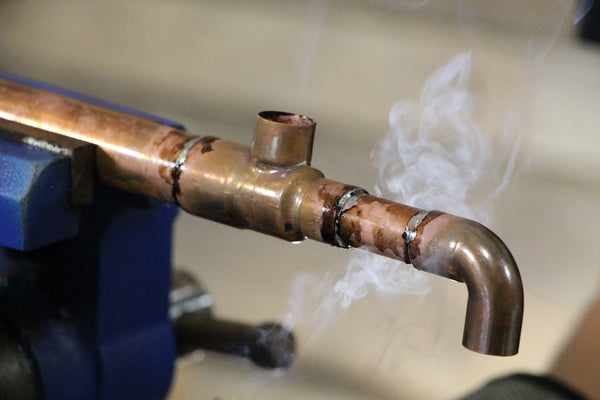
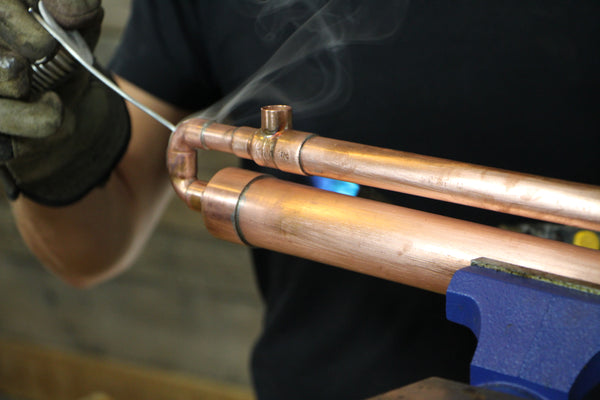
Install a 45 degree elbow at the bottom of the ½” tubing and attach a drip arm to that. Make sure it’s long enough to run all the way to your collection vessel, which should be located several feet away from the still. To assemble simply clean and apply flux to each part, then solder.
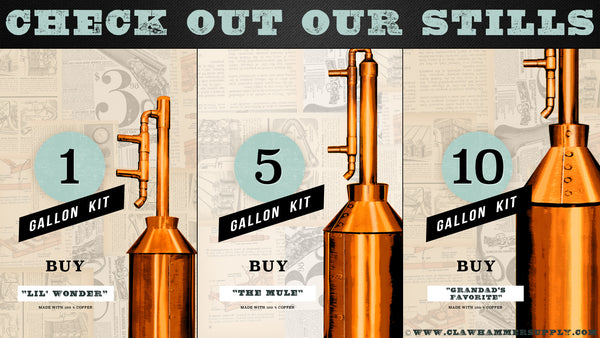
All of the parts shown here can be manufactured by hand. However, parts for 1, 5, and 10 gallon stills are also available for purchase on our site.


Thank you.
from south africa.
The pipe in a pipe their talking ABOUT is a leibig condenser ! I use one I built one outa 4 ft 2inch copper with a 2inch by 1/2 in reducer on one end my boiler has a one inch copper pipe that hooks to a 1inch by 2inch reducer and on top n bottom of 2inch pipe I have a 1/2outlet for cold water in and warm out on top in middle runs a 1/2inch copper pipe that one end connects to a 1/2inch by 1 reducer that hooks to boiler , water runs around 1/2 pipe thru 2inch thus cools pruduct .
Interested in a five gallon still, price an availability, I live Oklahoma, thank you
Looking into buying a still ,,what is the pricing?
I used wright’s copper cream to clean my finished still. This stuff is magical! Available at Walmart or amazon.
I live in North Carolina is there any way to get anyway to buy your products
I want to picture of collar be for it is braded and soidered
HOW DO YOU ADD THE WORT AND CLEAN OUT THE COPPER BOILER. IT LOOKS LIKE IT IS SOLDERED SHUT.
HOW DO YOU ADD THE WORT AND CLEAN OUT THE COPPER BOILER. IT LOOKS LIKE IT IS SOLDERED SHUT.
Hi, how y’all doin. I’ve been watching your YouTube videos and read the articles on building a 5 gallon still. It all seems simple enough to build and all, but I’m not quite sure how to run the condenser? I do recall that in the assembly that it’s a tube within a tube. So all that needs to be done is to run a cooling water line from bottom to top inlet and outlets? I’m thinking that I can run a small recirculating pump in a separate container of cold water the use as my cooling “tower” supply? I’m also thinking that I might have just answered my own question?
ok..ITS put together…now what???? I cant find any pictures or instructions…where does the required additional copper pipe go and water hose? how do i get shine out of this or even get it in there? this was for Christmas and for fun but we are stumped now….
thanks
what are the expected output amounts for the one and five gal. stills?