This blog provides information for educational purposes only. Read our complete summary for more info.
Corn Mash Recipe - Whiskey Mash

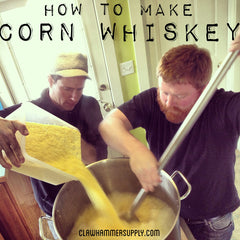
We made a corn whiskey mash recently and documented the process for others to see. Though, before we get started, a reminder: making mash is legal. It' just like making beer, which is legal in 48 states in the US. However, distilling alcohol is illegal without a federal fuel alcohol or distilled spirit plant permit as well as relevant state and local permits. Our distillation equipment is designed for legal uses only and the information in this article is for educational purposes only. Please read our complete legal summary for more information on the legalities of distillation.
The following is a detailed corn mash recipe, illustrated with pictures. This is one of our older recipes, so this is a tried and true process. For a newer version of this recipe check out our article on How to Make Moonshine.
When we tested this procedure, we had a fuel alcohol permit and we were in compliance with state and federal regulations. We produced, stored, and used this alcohol in accordance with TTB requirements. We also kept and reported production logs in accordance with TTB fuel alcohol permit requirements.
The following is how a commercial distillery would likely make corn whiskey
Mashing Equipment
-
First, making corn whiskey mash is pretty simple. Less equipment could be used, but having the following basic equipment will make this a lot easier. All a distiller needs is a large pot for mashing, a wort chiller for cooling liquid, a brewers thermometer, cheesecloth, a plastic funnel, and a spare plastic bucket for aeration. Make sure to check out our recommended distillation equipment guide.


Corn Mash Ingredients
- As far as ingredients go, a distiller needs the following:
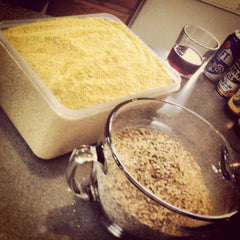
- 8.5 lbs. of crushed corn (sometimes called flaked maize)
- 2 lbs. of crushed malted barley*
- 6.5 gallons of water
- 1 package of bread yeast (Fleischmann's Active Dry works well)
*Note, barley MUST be malted, otherwise recipe will not work (more on this below).

How To Make Corn Mash
-
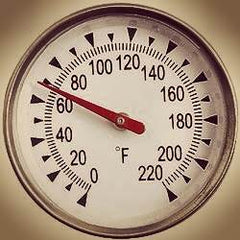
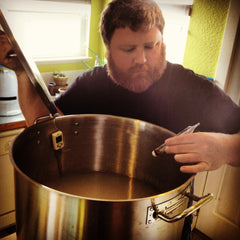
We heated 6.5 gallons of water to roughly 165 degrees Fahrenheit. Once the temperature was reached, we cut off the heat. It won't be needed for a while. Next, we poured all of the crushed corn into the water and stirred for 3-5 minutes. After that we stirred for 5-10 seconds every 5 minutes. This is the start of our mash.
-
The corn will turn to a "gel" as it gets stirred up. We weren't alarmed when this happened as this is perfectly normal. The corn is being broken down and starch is being released, which makes the mixture quite thick. Once the barley is added and mashing begins, the mixture will thin out considerably.


-
We monitored the temperature as we stirred. Once the temperature dropped to 152 degrees, we added the malted barley and stirred for 1-2 minutes. Once stirred, we covered and let the mixture "rest" (sit) for 90 minutes.
-
During the rest, enzymes in the malted barley will convert starches in the corn and the barley into sugar. Later, during the fermentation process, yeast will be added and the yeast will actually turn the sugar into alcohol. So, to rephrase that, what we're ultimately trying to do during mashing is turn grain starch into sugar so we can add yeast and turn the sugar into alcohol during the fermentation process. The enzymes found in malted grains (i.e. malted barley) are what convert the starches into sugar. Without enzymes, none of the starch will be converted into sugar and fermentation will fail. So, it is critically important to use malted barley, and not regular flaked barley, for this recipe.

-
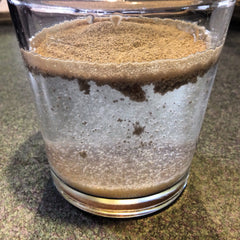
While the mash is resting, we made a "yeast starter" by re-hydrating our yeast in a glass of water. For this recipe, we added 2 packages of active dry bread yeast to 1/2 cup of 110 degrees F water along with 1 tsp. of sugar.
-
Completing this step allowed us to verify that the yeast is good (a "yeast cake" will form and expand on top of the water if it's working). This step also allows the yeast to get a "head start." Once added to the mash, the yeast will be able to begin rapid fermentation immediately. This reduces the chances of contamination of the mash by ambient bacteria.
-
After a 90 minute rest, we needed to cool the mash down to a temperature suitable for adding yeast. This is generally somewhere in the neighborhood of 70 degrees. To cool a mash, a distiller can either use an immersion chiller to rapidly cool the mash, or simply leave it sit for several hours. Once cool, we poured the mash through a cheesecloth (any fine strainer will do) to separate solids from the liquids.
-
It's always a good idea to cool the mash as quickly as possible to reduce the likelihood that the mash will become contaminated with ambient bacteria while it is sitting. Immersion chillers work great for this.
-
We like to use a cheesecloth to separate solids from liquids. We scoop a little bit into the cheesecloth bag at a time and then squeeze the hell out of it. Using small amounts allows us to wring out the bag and recover most of the liquid (which means we'll end up with more final product).


-
After cooling and removing grain solids, we aerated by pouring the mash back and forth between two sanitized buckets. We made sure to aerate aggressively enough to see froth and bubbles forming (that's a sign of good aeration). We poured the liquid back and forth 10-15 times. After aerating, we took a specific gravity reading by filling a test tube and using a hydrometer. Another way a distiller might do this is by dropping a bit onto a refractometer collection plate and taking a refractometer reading.
-
Aeration is critically important. Yeast need oxygen to survive. Without aeration fermentation could fail and the yeast won't do anything. Aerate!
-
The specific gravity reading is used to determine potential starting alcohol. Basically, it allows one to determine how much alcohol will be in the wash if everything goes well during fermentation. After fermentation, another reading will be taken to determine actual alcohol content of the wash. Both readings are needed to calculate this number.


-
After aerating and taking a specific gravity reading, we added the entire contents of our yeast starter to the mash. Finally, we transferred our mash to a fermentation vessel.
-
We use 2 small packages of bread yeast per 5 gallons of mash
-
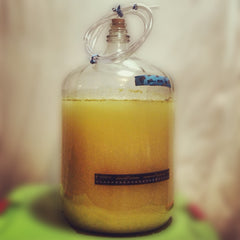
Our favorite container for fermentation is a 6.5 gallon glass carboy.


-
The last step of the mashing process is fermentation. Once the mash was transferred to the fermenter, we sealed it with an airlock and left it sit for at least 1 week. A distiller could leave this sit for as many as 3 weeks. If it's still bubbling, it's still fermenting. We left it alone until we didn't see any bubbles.
-
We made our own airlock using a rubber stopper, some clear plastic hose, and some zip ties. We looped the hose a few times and added some sanitizer solution so the very bottom of a few of the loops are full, forcing air to bubble out while not letting any air in.
Distillation
For a quick tutorial on how a commercial distiller would turn a wash into high proof alcohol, check out How to Distill - 101. Also, make sure to check out our copper still kits before leaving.


If you add sugar it will increase alcohol produced but it will no longer be pure corn whiskey and won’t taste as good. However if you add sugar 5 pounds would probably work ok.
I live in Europe and it is legal to make your own liqueur in my country :)
This is nice recipe without sugar, but how much sugar (maximum) can I put to increase amount of finished product? Of course, without having horrible headache because of too much sugar in the mash…
Thanks!
You can use corn meal but you will have to cook it at around 190 to 200 degrees for around 45 minutes to an hour.
Could you replace the crushed corn with cornmeal?
Hi do you post these stills to Australia and how much in postage.
my mash is seven days old and bubbles only occaisionaly. is it still good? i plan on cooking it today.
I love your info on here and appreciate all the effort you’re putting into it. At present, we are working with your Honeyshine recipe, but haven’t got all the bugs worked out. Thanks!
Hi again,
I forgot to mention I sort of tested it a few ways. I shook it up and it takes about 2-3 seconds for the bubbles in the jar to go away. I did the spoon test; it burns a very nice bright bluish purple.
I appreciate all the advice you could give me.
Thanks for your time.
One last thing; how can you tell the proof of your product.
Hi
I did my first batch yesterday. It fermented for about 18 days, no activity in the air lock and a reading of 1.00 on my hydrometer.
I made 5 gal of watermelon. After I produced 4 jars of product I shut it down. It was supper clear, but has a sweet to paint thinner smell. It does not taste sweet though really harsh bad taste.
What can I do to make it taste or smell better?
I still have about 2 gallons to run
Does anyone know how much backset you would add using this all grain recipe. It would have to be added after the malt had time to work because the ph of the back set is very low and would affect the starch conversion. I’m thinking of a percentage of the mash volume.
According to the Scotts and Irish who brought whiskey making here from Europe water is the key to good whiskey. However if you are making moonshine out of mostly sugar maybe not as important as it is with grain recipes. But you want fairly soft water, no iron, some calcium and ph around 5.5 to 6. If your well water meets those criteria then use it! As you get more into this stuff you will find out its a lot of work and if you really love it you will strive to make the best tasting stuff possible. If you don’t you will get tired of it quickly and give up!
what up:
cani use 1 one brass conector with my copper tubeing and can i use well water instead of purified water
what up:
cani use 1 one brass conector with my copper tubeing and can i use well water instead of purified water
Tyler – You can buy malted barley at any home brew shop. For all they know, you’re brewing beer.
Moonshine is alcohol, to be more specific moonshine is ethanol the same as bourbon or any other whiskey its just not aged in an oak barrel. Large scale moonshiners can use barley malt or even corn malt as popcorn Sutton used in his movie. Of course you have to be doing a cooked mash recipe to even need malt. If you are just throwing in some corn with your sugar for the flavor then malted barley or malted corn isn’t needed. The malt is used to convert the starch that you brought out from the corn into sugar that the yeast can consume which produces the alcohol.
How do large scale moonshiners get away with buying malted barley? As far as I can tell it’s almost strictly used to make alcohol.
excellent. thanks for the tip Stilldaddy……
@ ROGIE
you are getting a low ABV because you are using a crystal malt- don’t use crystal malts for your base grain. Use a two row malted barley. Use a two row, 6 row, distillers malt, marris otter, golden promise, but not a crystal malt. Here is a link to a good distillers malt http://www.thegrape.net/browse.cfm/distillers-malt-rahr/4,12902.html
I have tried this recipe twice now and have not produced anything drinkable. not sure what i’m doing wrong. the second mash seemed like it fermented perfectly but the product taste horrible.
Couple questions if someone could answer
1) What is the effect of doubling the ingredients. I am trying to end up with ten gallons of wash
2) I have used 2 row 75 ceystal malt barley both times because it seemed to be in the middle. Is this the right stuff or the wrong stuff?
3) Both attempts produced very low alcohol content the second batch of mash was something like 5% so i added 6 pounds of sugar before pitching the yeast which raised it to 12%
4) I’m using Flaked Maze, 75 2 row crystal malt barley and Fleischmans yeast just like the package shown, also using purified spring water and i am fanatical about sterilization and cleanliness.
Any help would be appreciated
Thanks
Is there an error in the instructions above? In these instructions, you aerate, then at the yeast. However, in some of your previous instructions (http://www.clawhammersupply.com/blogs/moonshine-still-blog/3386482-how-to-make-moonshine-part-1-the-mash) you add the yeast, then aerate.
Thanks and love the site.