
Making hard cider from scratch may not be as difficult as you'd think! At first, it might seem a little tricky, but it's actually fun and not too expensive. In fact, we made nearly 50 gallons of hard cider with only $100 dollars of apples. Here's the entire process from start to finish and as a bonus, we're going to let you in on a little secret: the best hard cider recipe of all time. We'll show you how to turn not-so-perfect apples into a delicious homemade drink with ease. Let's get started!
Table of contents
Buy Some "Bad" Apples
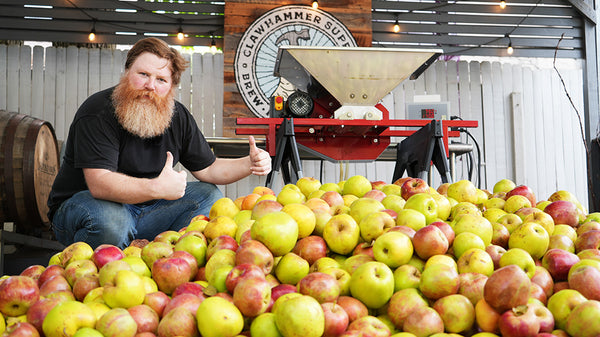
One of the most interesting things about hard cider is that the most delicious hard cider is often made with the "worst" apples! So, the first thing we did was find some cheap apples that weren't perfect. They had bumps and bruises and honestly, some were downright rotten. But that's okay for cider because it's all about how much sugar they contain. And these overly ripe apples are sure to contain a lot.
So, pro tip: Don't buy nice apples. We got these apples from a nearby orchard, and they cost way less than the pretty ones in bags. In fact, an entire truckload only cost us $100. If we had bought the same amount of "perfect" bagged apples it would have cost $660! For visual reference, here is Emmet in front of our truckload of apples:
Making Hard Cider in 4 Steps
Of course, to use this recipe you're going to need cider. You can buy some from the store, but you could also make some yourself! If you want to go the homemade route, here are the steps, which are split into four parts:
1. Crush
Next, we needed to crush the apples and get their juice out. We used a fruit crusher that was actually designed for crushing smaller fruit like grapes and softer fruit like peaches. It worked for the apples, but we could have found something better. Pro tip: Make sure your crusher is up to the task before you buy an entire truckload of apples or you might find yourself in over your head (like we did).
2. Press
We used an "antique style" fruit press. It's a bit slow, but it does the job and is pretty fun to use. We've seen several fruit presses that use car jacks and hydraulic presses, but we're not convinced they're worth the effort and money to build or buy.
3. Pasteurize
Instead of using chemicals to keep our cider safe to drink, we used heat to make sure it was clean and safe. This way, we didn't need any more chemicals than absolutely necessary. Some folks say that heat pasturization changes the flavor, but according to this article, statistically most folks won't be able to tell the difference.
To pasteurize we heated the cider to 170 degrees Fahrenheit in a 20 gallon brewing kettle. This kettle was perfect for the job because it includes a heating element and built in temperature controller to make sure we hit the target exactly.
4. Ferment
To make our cider special, we made 10 small batches using different kinds of yeast. Yeast is as close to a "magic ingredient" as there is. Not only does it convert sugar into carbon dioxide and alcohol, it also adds a lot of unique flavor to the cider. We added several varieties of ale yeast, Saison yeast, Belgian yeast, Wit yeast, Lager yeast, and even Kveik Farmhouse yeast.
Oh, and by the way, we know all of this because we've made a lot of cider. In fact, we recently made 50 gallons! Here's the process:
Add Hard Cider Spices - The Perfect Recipe
Crafting the perfect hard cider recipe is all about the finishing touches. Of course, the base cider has to be good, and it will be if you follow the instructions above. Though, to finish it off, add some spices.
Ingredients
You're looking to accentuate the apple flavor, not change or mask it. And making it "familiar" is a bonus too. So with that in mind, what's more "apple" than apple pie?
That's right, we like to treat our cider as if it's liquid apple pie! So we added the following:
- cinnamon
- ginger
- clove
- orange peel
- allspice
- vanilla bean
- pink peppercorn
- black peppercorn
Getting the spice ratio right is important. You can vary the percentages of the ingredients above, but the recipe should be 80% cinnamon, and all of the ingredients combined will weigh about 2 ounce. This will "spice up" (pun intended) about 5 gallons of cider in roughly 4 days.
Spicing Procedure
We'd highly recommend not adding the spices until near the very end of fermentation. And before adding them, soak them in some everclear for 30 minutes to kill any wild yeast or bacteria

Then either add directly to the cider or place in a muslin bag and add it to the cider (the muslin bag should be soake din alcohol too. Once steeping is complete, remove the spices or rack the hard cider into a different container for aging (or kegs or bottles). More on this below.
Bottling, Kegging and Serving Cider
Once the cider is done it will need to be packaged and carbonated.
Bottling Hard Cider
The most beginner friendly and least expensive option is bottling. Bottling cider is very easy and only requires a few steps. We've created an entire article on bottling cider, but here is a quick synopsis:
- Clean and sanitize bottles
- Add priming sugar
- Fill the bottles
- Cap the bottles
- Carbonate and age
Kegging Hard Cider
While bottling is the cheapest method of packaging hard cider, the easiest and most convenient way to do it is to keg. It's a pretty simple process. However, this process does require a keg, a CO2 tank and regulator, and a picnic tap. Of course you'll need to store the keg in a kegerator as well.
To keg cider, chill it down to 40 degrees or less and leave it sit for several days. Then siphon into a sanitized keg. Purge with CO2 to remove oxygen. Then toss it into a kegerator and set the CO2 pressure to about 12PSI. I'll be carbonated and ready to drink in a week!


Leave a comment