We've received a lot of questions about the actual mechanics of brewing 5 gallon (finished) batches of beer using a 120 volt power supply.
This biggest challenge associated with electric brewing on a 120v, 15 amp circuit is that a maximum of 1650 watts of heating power is available to heat a relatively large volume of liquid during the boil. For example, some styles and recipes may call for a boil of more than 7 gallons of liquid. That's a lot to ask of a 1650 watt element.
Following is everything we've researched and tested with regard to the mechanics of heating and boiling during the brewing process, including results and our suggestions on how to get the most out of any electric brewing system running on a 120 volt circuit.
After you're done with this article, make sure to check out our article on the importance of boiling wort, where we discuss why wort is boiled during brewing and how it impacts the quality of finished beer.
Note: Technically up to 1800 watts will be available on a 120v, 15amp circuit using the W=VxA forumula, but 1800 watt elements don't exist. Element sizes jump from 1650 watts to 2000 watts. Unfortunately 2000 is too big for a standard residential circuit. A 2k element would require an upgraded controller, a 20 amp circuit and a special plug.
Boiling Wort with 1650 Watts
Our research and testing indicate that it is possible to boil up to 7.5 gallons of liquid using a 1650 watt element on a 120V, 15amp circuit. However, as with a lot of Brew in a Bag (BIAB) processes, the approach may need to be a bit different depending on variables such as:
- power supply variability,
- elevation,
- and kettle location and placement.
Power Supply Variability
There are voltage drops though the wiring in every house as well as across extension cords, etc. Voltage may measure 120 at the outlet in one house but only 110 in another. Abnormally low voltage at an outlet or the use of long or light duty extension cords will reduce the power available to the controller and element. Improper use of extension cords can be dangerous as well.
Always plug the controller directly into a GFCI outlet to maximize the power available to the heating element. Extension cords are not recommended. If one is used, we recommend 10AGW, rated for 15 amps. Because extension cords create safety hazards, especially when being used near liquids, we do not endorse their use with our brewing systems.
Controller and Pump Power Use
Because the controller, element, and pump all run on the same circuit, they all compete for the power coming out of the outlet. Most controllers us a very small amount of energy. Clawhammer’s controller only uses 15 watts! However, pumps use more.
To increase heat up times and boil vigor, don’t run the pump while heating or boiling. The pump will increase heat loss while simultaneously reducing the amount of energy available to the element.
Elevation
Atmospheric pressure decreases as elevation increases, which impacts boil temperature. Water boils at 212F at sea level but as elevation increases, boil temp drops. At 500' boil temp is 211. At 1000' boil temp is 210F. At 2000' boil temp is 208. And at 5000', boil temp is only 202!
Bottom line is this: If the place you live is located at 2000' elevation and you're unable to get the temp probe to read any higher than 208, that's because it will only read a max 208 while boiling! Practically, this also means that it will be a tad bit harder to achieve a boil at lower elevations.
Kettle Lid Position
Achieving a vigorous boil regardless of power supply and elevation will be impossible on a 120V circuit with the lid completely off of the kettle. Boiling with the lid on but cracked flies in the face of a lot of conventional brewing knowledge, but single kettle brewing was considered “impossible” when people first started doing it.
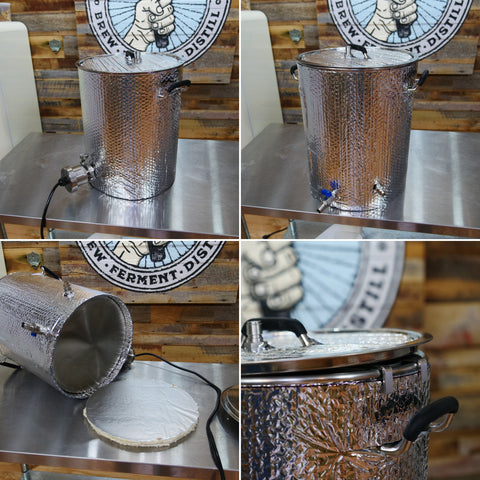
Specifically, we boil with the lid completely on the kettle, allowing the hop basket to prop it up slightly off of the rim, which only leaves about 3/8 of an inch between the lid and the kettle. We've done some serious testing here to see how this affects DMS retention, hop isomerization, etc. and have found no impact (full test results are below). As long as there is even a tiny crack for vapor to escape, you're good.
Kettle Location and Placement
Conduction, convection and radiant heat losses at the kettle due to ambient air temp and other factors will impact the boil as well. For example, brewing outside during the winter may make it impossible to achieve a boil. Also, placing the kettle on a thick metal table will cause conduction losses that could also prevent a kettle from boiling.

To Address environmental issues brew in a heated. Also, insulate the brewing kettle. Install enough layers of foil faced polyisocyanurate (don't use eps or xps foam, it will melt) under the kettle to achieve at least R-9 and wrap the sides and lid of the kettle with foil faced bubble wrap and attach with foil tape. Depending on conditions and available power you may need to wrap the sides and lid twice.
Boosting Boil Performance
Achieving a boil using an electric brewing system with a 1650 watt element should be possible if all our recommendations are followed. Here’s a quick summary:
- Don’t use extension cords.
- Keep the pump off while heating up to target temps and while boiling.
- Be aware that boil temp changes with elevation.
- Boil with the lid on and only slightly cracked.
- Insulate the top, sides, and bottom of the kettle.


Leave a comment