How to Insulate a BIAB / Brewing / Boil Kettle

This blog provides information for educational purposes only. Read our complete summary for more info.

how to insulate a brewing kettle

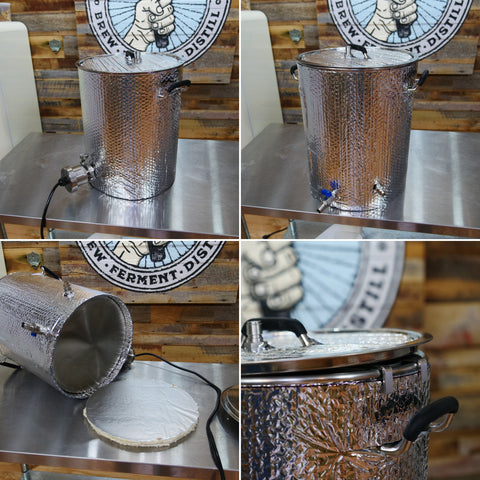
Achieving a vigorous boil with only 1650 watts can be tricky, but with kettle insulation as well as very precise lid placement, it isn't a problem. In this quick tutorial we add add insulation to Clawhammer Supply's 10.5 gallon BIAB Homebrew System.

For the full (and very nerdy) article on boil mechanics, brew chemistry, etc. Check out our article on brewing with 120 volts.

Materials needed

  • One 4x8 sheet of R-3 foil faced polyisocyanurate insulation board
  • One small roll of foil faced bubble wrap.
  • One small roll of foil HVAC tape

Tools needed

  • Straight edge
  • Sharpie marker
  • Scissors
  • Utility knife

Process

  • Place the kettle on the insulation board and trace separate 3 circles, using the inner curve of the kettle bottom as a guide. Cut the circles with a utility knife. Stack them on top of one another and tape together with foil tape.
  • Cut a piece of bubble (using scissors) wrap that measures 45" long x 16" tall.
  • Also, place the lid right side up (like you would normally place it on the kettle) on the bubble wrap and trace the inner circle, under the lip of the lid, with the sharpie. Cut the circle with scissors.
  • Attach the sheet to the kettle using foil tape, cutting holes for bungs and handles. Attach the circular piece of bubble wrap to the lid, using foil tape.

Once insulated, and with the lid resting on top of the kettle, using only the hop basket to provide an opening, a full, rolling boil will be achieved.

Portrait of Kyle Brown

Kyle Brown is the owner of Clawhammer Supply, a small scale distillation and brewing equipment company which he founded in 2009. His passion is teaching people about the many uses of distillation equipment as well as how to make beer at home. When he isn't brewing beer or writing about it, you can find him at his local gym or on the running trail.

Leave a comment

Please note, comments need to be approved before they are published.

12 Comments

  • T
    Comment Author: Tristan

    Outstanding. I appreciated all the help from emmet.
    I assembled the system without difficulty. Yes, I did a few modifications, adding a sight glass to watch the wort as it flows out of the pump. my old 40 plate chiller (my old system burned out—won’t say the brand), a couple of right angle stainless steel angles.

    Yeah, I could have bought the basic system, but I really like to have a few extras. You never know…😉

    Can’t wait for my first brew day with this system.,

  • D
    Comment Author: Dan

    What is the size of the port for the heating element? 2"?
    I already have a 5500w/pid controller 240v system and would want to use it so need to know size?

  • M
    Comment Author: Markus

    I’d like to try the insulation part on my kettle, and I think I’ve found the right Foil, but I am not sure the fooil will withstand boiling temperature. Are there ones that don’t? Can you Recommend A Brand or Kind?

  • C
    Comment Author: Chris

    What is the max grain bill i can use with this and still achieve 7.5 gallons pre mash

  • GR
    Comment Author: George Reinhart

    Is the chiller that efficient that it only needs the one pass to cool to pitching temp? Or do you recirculate the into the kettle until it reaches the correct temperature?