 Essential oils are commonly known for their wide variety of uses, from aromatherapy to cooking additives. Purchasing essential oils can be expensive, however making them at home with our essential oil distiller is much cheaper.
Assembly Video
*Depending on what accessories you order the assembly process may vary, please continue reading for more information.
What's IncludedThe base system comes with
- Two 8 gallon stainless steel boilers. (one for water and one for plant material)
- Sight Glass Tube. (to monitor the liquid level)
- 2-piece column / condenser.
- Two built-in safety pressure relief valves (set to 5psi).
- All necessary tri-clamps, fittings, and gaskets.
- All necessary stainless pipes to attach the two boilers.
- Welded 1/4" bung on the domed lid.
- Welded 1/2" NPT port on the boiler.
- Welded 1.5" ferrule on the boiler.
Recommended Accessories
When purchasing our essential oil distiller, we recommend the following accessories to make your distilling experience much easier. All of these can be found on the main product page.
- Boiler thermometer
- Column Thermometer
- Controller Kit (Included in this kit are the following)
- 1650 watt digital electric controller
- Waterproof PT100 temperature sensor
- Heavy duty stainless steel element adapter
- 1650 watt stainless steel heating element
- 8 foot 15 amp controller power cord
- 6 foot 15 amp element power cord
- 1/2" NPT thermowell
- Output hose
- Thread tape
We do not sell the following products, but you will need them for a complete assembly
- Garden hose
- 5/8 in hose clamp
Assembly
Step 1: Install Threaded Inserts
To make sure all the threaded inserts are tightly secured, wrap your fittings with thread tape. Thread tape helps seal and prevent leaks while also working as a thread lubricant.

To install thread tape, securely wrap it around the threads 2-3 times. Make sure the tape is flat (not bunched up) over the threads.
Once the threaded inserts are wrapped, place each component in its corresponding opening and hand tighten. Then, take a crescent wrench or a pair of pliers and tighten firmly. If using pliers make sure you cover the fitting with a rag to protect it.

Using a crescent wrench to tighten a fitting
Apply thread tape to the following fittings

Pressure Relief Valve

Thermowell (left) & Sight Glass Tube (right)
Note: You will only have a thermowell if you purchase the controller kit. By default there is a plug on the front of the sight glass. You can also install a thermometer here.

Column & Boiler Thermometers

1/4 in Bungs. These fill any holes that would otherwise be filled by optional accessories.
Step 2: Assemble the Steam tubes

To assemble the steam tube, place all components flat on a table and begin connecting one tube to another. Following the photo guide below, place a silicone gasket between each pipe and clamp them together using a tri-clamp.


Our system includes all the gaskets and tri-clamps that you will need. When assembling the steam tube make sure you connect the correct long pipe, the one that fits here is the 15.75in. If you attach the 15in long pipe that is meant for the column, your two vessels will not line up correctly.
Step 3: Connect the Steam Tube to the Boilers
Locate the water boiler, this is the large pot with the sight glass on the front, and place the lid on top of the boiler with a large butterfly clamp. The still lid has a gasket already built into it. To attach the steam tube to the water boiler, place it on top of the water boiler with a silicone gasket and secure it with a tri-clamp.

Next, connect the steam tube to the input of the second vessel with a gasket and a tri-clamp.

Step 4: Install the False Bottom
Once the two stills are connected, insert the false bottom into the second vessel. To do this, fold the false bottom in half and place it in the vessel, once it is in the vessel unfold it and place it on the bottom.

Step 5: Attach the Column and Condenser
Place the lid on top of the second vessel and secure it with a butterfly clamp, note the lid has a built-in gasket, so there is no need for an additional one.
Attach the 15inch column to the top of the lid with a gasket and tri-clamp. In our assembly video we attach a column thermometer, which is a recommended accessory.


Before installing the condenser you will need to attach some hoses to it. You will need your own hoses and hose clamps for the condenser. We used nice silicon hoses but regular garden hoses will work just fine. Cut a garden hose in 1/2 and attach the cut ends to the condenser by using 5/8th inch hose clamps. Please follow the diagrams below.


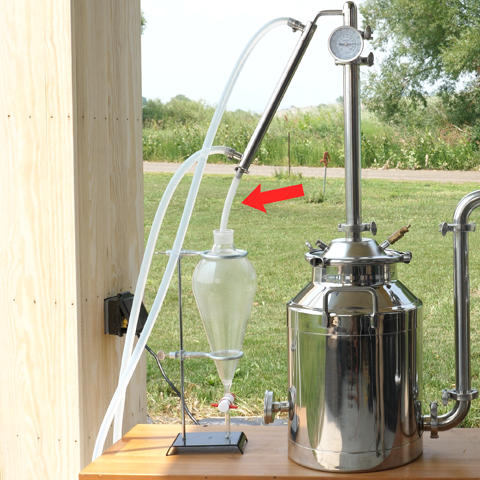
We recommend attaching a food-grade silicone hose to the lowest port of the condenser. This is where the distillate and other extracts will come out. This tubing can be purchased on our website as an accessory. Our output hose is made out of high-quality food-grade material and comes with hose clamps.
Step 6: Set up the Controller and Heating Element
To get the water to a boil, you will need a source of heat. Our 120v controller and heating element are not included in the base system, however we highly recommend these accessories for an easier distilling experience. Everything in this step is included in our controller kit, which can be purchased as an accessory with our still.
First, install the thermowell into the front of the sight glass.
Next, assemble the heating element. You'll need to watch this video to do that.

Once the heating element is assembled slide the heating element into the 1 ½ inch ferrule on the lower side of the water boiler. Don't forget to add a silicone gasket! Secure the heating element with a tri-clamp and then plug the heating element into the controller. After plugging in the heating element, install the temperature probe. The shorter end of the temp probe goes into the controller, and the longer end goes into the thermowell, located on the front of the sight glass.
It is super important to fill the vessel with water before turning on the heating element. Failure to do so will result in a dry fire which can ruin the element.
Using the Essential Oil Distiller Kit
Now that your still is assembled you are ready to distill essential oils. Watch this video and read this article to learn more about distilling essential oils with your Clawhammer Supply Essential Oil Distiller Kit!


Leave a comment