
Lavender oil, a type of essential oil, can be extracted from lavender plants and is valued for its aromatherapy and medicinal uses. Purchasing lavender oil can be very expensive, however, making it at home is much cheaper and still provides a high quality 100% pure product. Steam distilling lavender oil at home is an easy, safe, & effective way to extract oil from your favorite plants.
Before we get started, it should be noted that we're going to be distilling lavender oil and hydrosol in this tutorial. However, this process can be used for a number of different herbs, including but not limited to; rose, citrus, bergamot, mint, peppermint, lemon, frankincense, Thieves, lemongrass, nettle, CBD, etc.
We're also going to be showing how to steam distill in this article. However, one could easily water distill by omitting the steam boiler and adding lavender and water directly to a single kettle and placing the column and condenser straight on top of that kettle. Water distilling is ideal for making some types of oil and hydrosol but not for others. Lavender oil is best extracted using steam distillation.
If you're wondering how to assemble our Essential Oil Distiller Kit - Read this article. This article assumes your distilling kit is already assembled and you are using our 120v Controller & Element Kit.
This article discusses how to make lavender oil using steam distillation. Watch us use it in the tutorial video below.
Step 1: Water
Fill the water boiler with water, this is the boiler that does not have the column and condenser. To ensure you have an adequate amount of water, use the sight glass tube. There just needs to be enough water to cover the heating element, but make sure to account for water loss during the distilling process.

Once water is in the boiler, ensure the two vessels are disconnected and then set the controller to 100% of power in order to start a boil. Research has shown to get a better yield of oil and hydrosol it is better to add hot steam directly to your lavender rather than waiting for the temperature of the steam to slowly build up over time. This is why the two vessels should be disconnected at this point.

Step 2: Gathering Lavender
Knowing when to harvest lavender plants can affect your essential oil yield. Harvest your lavender plants when the buds are just starting to open. It’s best to harvest the lavender in the morning just after the dew dries for max oil yield. Cut the lavender 2-inches above the woody growth, taking the entire stem with you when you harvest them. It’s recommended that you use a harvesting knife, however, a simple pair of hand pruning clippers will also work.
Pro Tip: The faster you get your lavender into the distiller the better. Once lavender is cut it begins to dry out and loses its potency.

Step 3: Load Lavender
Insert the false bottom into the base of the plant boiler, this will ensure that steam is evenly distributed throughout the lavender.
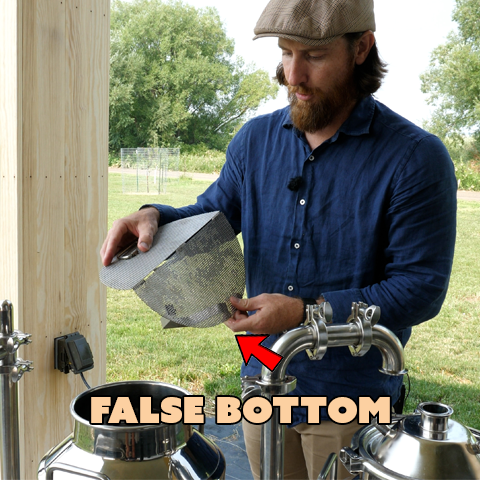
Start loading the plant boiler with lavender. Our 8-gallon boiler holds about 2 lavender shrubs worth of plant material, roughly 10lbs. Avoid packing the boiler too tight, otherwise steam will not reach all the material.
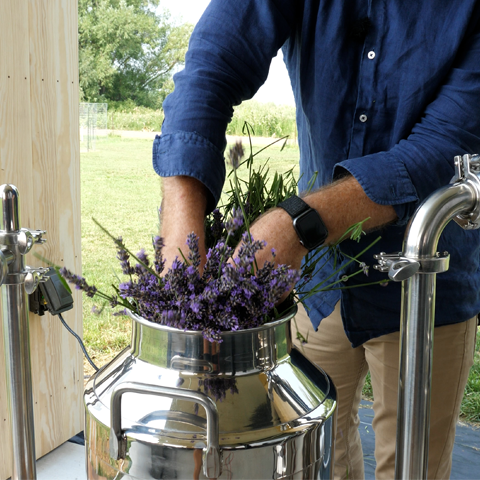
Once all the lavender is packed into the plant boiler, attach the column on top of the plant boiler and secure it with the butterfly clamp. Connect the two boilers once the water has started boiling.

Step 4: Turn on cooling water
After connecting the boilers turn the cooling water on for the condenser.

Step 5: Collect the Hydrosol & Lavender Oil
Once the two boilers are connected and cold water is flowing through the condenser column, the plant boiler will begin to heat up. At around 170°F the first drops of fluid will appear, this fluid is a mix of hydrosol and lavender oils.
Once the column thermometer reaches 202° a steady stream of fluid will begin to flow. Its recommended that you run the system from anywhere between 45m & 1 hour to get the most product out of your lavender.
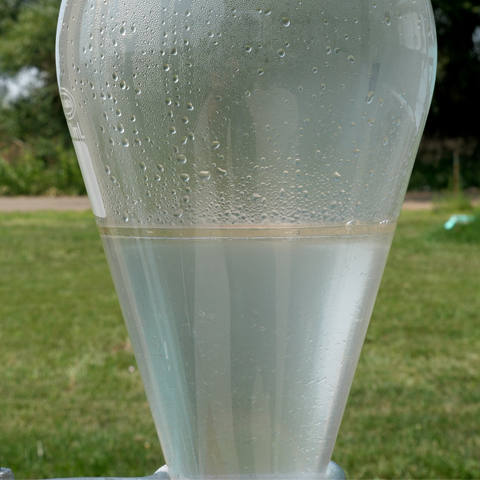
Step 6: Separate Liquids
Because lavender oil has a lower density than hydrosol, it naturally rises to the top while hydrosol settles to the bottom. In order to encourage this natural separation, we collect all of the fluid in a separatory funnel using laboratory support stand. This device helps separate liquids of different densities and allows them to be collected without mixing the fluids.
Wait about 15-30 minutes after distilling ends for lavender oil & hydrosol to completely separate.
Step 7: Collecting & Storing
Using a separatory funnel, turn the knob at the base to start collecting hydrosol. Once all the hydrosol has been collected, turn the knob again to stop the flow of liquid. Using another collection vessel, turn the knob a final time and collect the lavender oil.
Essential oils are the most common desired products of distilling, however, hydrosol has recently gained popularity over the last few years as people have been using them as a cleaning additive and using them as natural household air fresheners.
The best place to store your lavender oil is in a cool, dry place such as a kitchen cabinet or a medicine cabinet. It's best to keep oils away from direct sunlight or any other direct heat and light sources.
Uses of Lavender Oil
Lavender oil is a versatile product with a myriad of uses. It's a favorite in aromatherapy for its calming and soothing properties, often used in diffusers or added to bathwater for a relaxing soak. In skincare, lavender oil is praised for its potential anti-inflammatory and antiseptic properties, which can help soothe minor burns and skin irritations. It's also commonly used in homemade cleaning products, providing a natural fragrance and cleaning power.
Benefits of Lavender Oil
The benefits of lavender oil extend beyond its pleasant aroma. It's often used in aromatherapy to promote relaxation and alleviate stress. Some studies suggest that it may help with sleep issues, anxiety, and even migraines. In skincare, lavender oil can potentially help soothe inflammation, fight acne-causing bacteria, and promote wound healing. However, remember to always dilute essential oils in a carrier oil before applying to the skin to avoid irritation.
Frequently Asked Questions
Can I use a different type of lavender for my oil?
Yes, there are many varieties of lavender, and while they may produce slightly different scents, most are suitable for oil distillation.
How long does homemade lavender oil last?
When stored properly, your homemade lavender oil can last up to a year. Always store it in a cool, dark place and keep the container tightly sealed.
Can I use lavender oil directly on my skin?
Essential oils are potent and should always be diluted in a carrier oil before applying to the skin. Test a small amount on your skin first to ensure you don't have an allergic reaction.
The Infusion Method
If you're looking for a simpler method to extract lavender oil, you might consider the infusion method. This involves steeping dried lavender buds in a carrier oil of your choice for several weeks. While this method may not yield as much oil as steam distillation, it's a simpler process that can be done with common household items.
Safety Precautions
When making and using lavender oil, it's important to remember a few safety precautions. Always use equipment as directed and be mindful of the heat when operating the distiller. When using your homemade lavender oil, remember to always dilute it in a carrier oil before applying to the skin. If you're pregnant, nursing, or have a medical condition, consult with a healthcare provider before using lavender oil.


Leave a comment