
Homebrewing is one of the most rewarding hobbies out there that also gives you a great reason to hang out with your friends. The best part? It’s easy and affordable. You may be intimidated by the wealth of information on the internet, but we encourage you to look no further. This is the complete guide to brewing your first all-grain beer at home.
The recipe below is for a SMASH beer. Single Malt And Single Hop beer - these are some of the easiest beers to make because they require the smallest amount of ingredients. This doesn’t mean they’re any less flavorful. Instead, recipes like this let the flavors of the malt and hops shine through more than any other style. You’ll know exactly what you’re tasting.
Ready? Watch the video below and follow along with this article to learn all about brewing your first beer at home.
Full How To Video
Brewing Equipment Needed
- 10 Gallon 120 Volt Electric Brewing System
- 7 Gallon Bucket Fermentation Kit (With a bucket opener)
- Brewing Hydrometer
- Stainless Steel Auto Siphon
- Star San & PBW
- Xtra Hop Basket (optional)
- Scale
- Grain Mill (optional)
- Milwaukee MW102 PH Meter (optional)
- Mash Paddle
- Bottling Wand
- Bottles & Caps
- Bottling Bucket
Ingredients Needed
You can find these at your local homebrew shop. If you don’t have one, we recommend giving Asheville Brewers Supply a call!
- 10 lbs 8 oz of Pale Malt (2 Row)
- 8 oz of Zappa hops
- 1 Package of American Ale Yeast (White Labs WLP060)
- 5 oz. of priming sugar (corn sugar)
Step 1 - Water
Fill your kettle with 7.2 gallons (27.3 liters) of water. Go ahead and set your controller to 152F (66.6C) before moving on.

Filling our kettle - All of our brewing kettles have gallon markers on the inside
Step 2 - Water Chemistry
Adjust water chemistry. At the very least, we recommend removing chlorine from your water. This can be done by using store bought spring water, letting your water sit for 24 hours, or by adding half of a Campden tablet to it.

Campden tablets can be found at your local homebrew shop or online
Adjusting water chemistry further can be a bit daunting for beginners, so we want to stress that it’s not critical in order to make good beer. If this batch turns out great and you’re interested in taking your homebrew to the next level, we’ll link some resources below that will help make your water chemistry perfect.
The Beginner’s Guide to Brewing Water Chemistry: https://www.brewcabin.com/brewing-water/
BeerSmith (brewing software): http://beersmith.com/
Bru’n Water (brewing software): https://www.brunwater.com/
Step 3 - Grind Grain
Grind your grain. You can ask your homebrew shop to do this for you, but we always do it ourselves so we can crush it as fine as we want. For our system, you’ll want your grain to be finely crushed. In order to achieve this, we crush twice.

In this image you can see the difference between grain that's been crushed once and twice
Step 4 - Remove Yeast
Remove your yeast from the fridge. Do this to let it gradually warm up to room temperature.
Step 5 - Mash
Connect all of your hoses up (watch this video to learn how), insert your grain basket, and pour your crushed grains into your kettle. Your water should be heated to 152F (66.6C) by now.

Mashing In
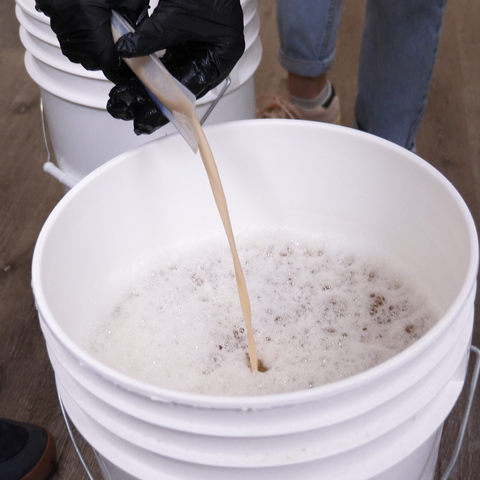
As your mashing in, it’s a good idea to stir your grain in order to remove any clumps.

Stirring mash with a mash paddle
Once you’re done mashing in, turn your pump on and recirculate for 1 hour.

Recirculating wort during the mash
The mashing process extracts sugar from grain, turning the water into what brewers refer to as wort. The sugar that is extracted at this point in the process will later be turned into alcohol.
Step 6 - pH
Adjusting PH is another optional water chemistry step. Doing this will help your efficiencies (the amount of sugar extracted from the grain) but it’s not critical. A pH of 5.2-5.4 will help extract the most sugar from your grain.

In order to check and adjust pH, we take a sample during the mash and use the Milwaukee MW102 to check the pH. We recommend using this pH meter as opposed to pH strips (difficult to use) or cheap pH meters (they break easily). To adjust the pH, slowly add lactic acid. It’s easy to add too much of this stuff, so add a bit, wait, check pH, and add more if needed.

Our pH after adding lactic acid
Step 7 - Boil
At the end of your 60 minute mash, hook your grain basket above your kettle and set your controller to 100% of power in order to start a boil.

Hooking the grain basket after mashing - we sell a pulley that makes this easier, it's a good idea to have one if you're brewing alone.
After 10 minutes, you’ll want to remove the grain basket and crack your lid to more easily start a boil. This recipe calls for a 1-hour boil.
During the boil, hops are added. Hops that are added at the beginning of the boil contribute more bitterness to a beer, while hops that are added at the end of or after the boil contribute more aroma and flavor to a beer.

In beer recipes, the hop schedules are written “backwards.” So a 60 minute hop addition means to add hops when there is 60 minutes left in boil. The hop schedule for this beer is as follows.
60 minutes - 2 ounces of Zappa hops
With 5-10 minutes left in your boil, connect your plate chiller and run boiling wort through it. This ensures that it is sanitized.
5 minutes - 2 ounces of Zappa hops
Flameout - 4 ounces of Zappa hops
A flameout addition is when hops are added after the boil with no heat. We let our flameout hops sit for 20 minutes before moving on.

Fresh hops look like this

But when you buy them they are often pelletized
Step 8 - Chill
It’s now time to chill our wort to 70 degrees Fahrenheit (21.1C) by using the plate chiller we sanitized during the boil. The plate chiller works by running cold groundwater and hot wort side by side, separating them by a thin piece of metal.

Fully connected plate chiller
Step 9 - Sanitize
While your wort is cooling, prepare a sanitized fermenter. Sanitation is one of the most important parts of the brewing process, especially once your done boiling. Anything the chilled wort comes in contact with must be sanitized, otherwise, you’re at risk of a bad tasting beer.
We use Star San to sanitize, this is a food-safe, no-rinse sanitizer that many homebrewers use. We put one ounce of this into one of our 7 gallon buckets and then filled it up with 5 gallons of water, making sure that all surfaces (even the lid & our hands) come in contact with our sanitizer solution.

Transferring our sanitizer solution out of our fermenter - filling your fermenter all the way with Star San and warm water ensures it is entirely sanitized
Step 10 - Yeast
Once your wort has reached 70F (21.1C), transfer it into your sanitized fermenter. While your transferring, take a ~10 ounce sample, we’ll use this in a later step.

Fermenter full of wort
Before cutting into your yeast packet, remember that sanitation is still important. Sanitize your scissors and the outer packet of yeast. Cut the very top of your yeast packet in order to remove the inner packet (there’s two layers to a White Labs Pure Pitch yeast package). After sanitizing the inner packet, it’s now time to finally cut open the packet and pitch your yeast.
Pitching yeast
This yeast sanitation process is the process White Labs recommends homebrewers practice when using their yeast.
Step 11 - Aeration
After pitching your yeast, put a lid on your fermenter and shake it for 1 minute. Doing this aerates the wort, which helps the yeast ferment.
Step 12 - Airlock
Insert an airlock into the top of your fermenter. This will allow CO2 to escape (a byproduct of fermentation) and nothing else to enter.

Inserting an airlock into the fermenter
Step 13 - Gravity
Insert a brewing hydrometer into the sample of wort you took while transferring. Make note of the number your hydrometer shows, this number will later be used to determine the ABV of your beer.

Important note: Read the instructions on your hydrometer to see what temperature it is calibrated for. If your wort is hotter or colder than it’s calibration temp, you’ll need to adjust your gravity based on the instructions included with your hydrometer.
Step 14 - Ferment
Leave your fermenter full of wort and yeast at room temperature for 2 weeks. At the end of our 2 weeks, we cold crashed the beer for 4 days at 33F (.5C). We use a temperature controlled fermentation chamber to do this, but you can easily do this with a regular refrigerator.
Keeping your beer at close to freezing temperatures after fermentation, or cold crashing, causes most of the particulates that are floating around (like yeast and hop debris) to settle to the bottom. Cold crashing will increase the clarity of your beer. Sometimes you want a hazy look, but we wanted this beer to be as clear as possible.

First look at our beer after fermentation - it is obvious that our beer had a healthy fermentation because there are no pellicles on top
Step 15 - Priming Sugar
The most beginner-friendly way to carbonate beer is through bottle conditioning. This process requires a much smaller investment than carbonating with a keg and CO2 tank. In order to carbonate our beer in bottles, we have to make a priming sugar solution.

This is just corn sugar
This is as easy as dissolving 5 ounces of corn sugar into a small amount of water, heating the water to a boil, and then cooling it back down to room temperature.
How does sugar carbonate beer? Adding this sugar will cause the residual yeast to start fermenting again. When this happens in a closed bottle, the CO2 that’s produced from fermentation gets trapped and incorporates into the beer, creating carbonation. Be warned - too much priming sugar can mean too much CO2, resulting in exploding bottles and over-carbonated beers. Here is a good calculator that we use sometimes to calculate how much priming sugar to use.
Step 15 - Alternate
There are actually 2 ways to carbonate beer in bottles. In our opinion, making a big batch of priming sugar and adding it to all of your beer at once is the fastest option, but you can also use conditioning tablets. Conditioning tablets do the same thing as priming sugar (they’re just sugar tablets) except you add them to each bottle individually.

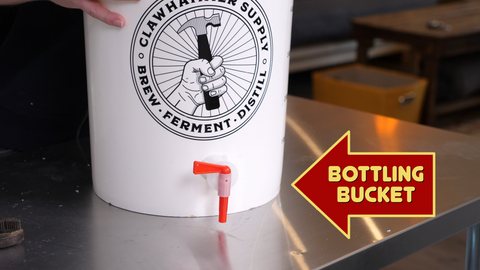
Step 16 - Siphon Into a Bottling Bucket
In order to transfer our beer into bottles, it has to be in a bottling bucket. This is just a bucket with valve on the bottom that we can attach a bottling wand to.
Why can’t we just pour the beer into the bottles using a funnel? Splashing the beer around after fermentation will aerate it, this was good before fermentation, but aerating after fermentation will make your beer taste stale - think cardboard or wet paper. This is why we’re siphoning it into a bucket that can fill our bottles up in a controlled way.

Siphoning our beer into a bottling bucket - we use this siphon
When siphoning wort out of your fermenter into the bottling bucket, you’ll need to leave a little bit of beer behind. You’ll notice that there’s a large yeast cake at the bottom of of your fermenter, it’s necessary to leave some beer behind so this yeast doesn’t get into your final product.

The yeast cake at the bottom of our fermenter
While siphoning, take a sample of the beer and take one more gravity reading. Insert your original gravity and your final gravity into this calculator, now you know your ABV.
Step 17 - Add Priming Sugar
Add your room temperature priming sugar solution to your bottling bucket. Lightly stir everything around to ensure even incorporation.

Adding our priming sugar solution to our bottling bucket
You should also attach a bottling wand to your bottling bucket at this point. Bottling wands only release liquid when their spring loaded tip is pushed down.

Attaching our bottling wand to our bottling bucket - we recommend using a nice bottling wand like this one
Step 18 - Clean Your Bottles
Cleaning your bottles is just as important as cleaning your fermenter. We do this by running our bottles through our dishwasher using PBW (Powdered Brewery Wash), not dish detergent.

PBW is a cleaner similar to Oxi Clean used by homebrewers and professional brewers. After running them through the dishwasher, we dunk each one in a Star San solution (including whatever caps you’re using as well)

Dunking our bottles and caps in a star san solution
Step 19 - Bottle!
Use your sanitized bottles, caps, and bottling wand to bottle all 5 gallons of your beer!

Bottling our beer using a bottling wand

We bought bottles with reusable swing top caps, you can also cap or cork your beer
2 Important Things
- Keep your bottles at room temperature until they’re ready to drink. Putting them in the fridge will prevent them from carbonating
- Wait around 2 weeks to pop your first bottle, that’s about how long bottle conditioning will take
Step 20 - Drink!
You may have noticed that in our video, we cheated and quick carbed some beer in a keg to drink it right after we bottled. Letting your bottles condition for 2 or more weeks is a much better way to carbonate beer and is also more rewarding.

This finished beer tasted nice and hoppy with some unique citrus, spicy, and floral flavors. The Zappa hops we used definitely contributed some of these unique flavors to our beer. Overall, this is a great tasting beginner recipe that we’re sure your friends and family will love!


Leave a comment